NVR: How to View and Download Video
Section 1: Logging In
Section 2: Viewing your Cameras
Section 3: Run as Administrator
Section 4: Saving Photos and Video from Live View
Section 5: Playback
Section 6: Download
Section 7: Additional Support
Quick Troubleshooting
Q. I can't view my cameras.
A. Viewing cameras requires Internet Explorer. Make sure you are using Internet Explorer (not Microsoft Edge or any other browser).

Follow any instructions on screen to install and allow plugins to run.
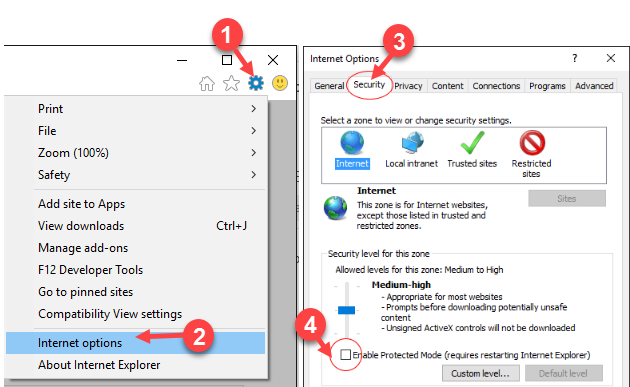
If you still have problems, try setting the site as a Trusted Site. This step is not usually necessary but may solve some more complex issues depending on your internet settings configuration. Navigate to the NVR's web address, then click on the Tools menu (looks like a gear). Select Internet Options. Under the Security tab, click the “Trusted Sites” zone. Click the Sites button. Then press "Add."
Q. The video is choppy or fuzzy when I view it live.
A. Live video playback is limited by bandwidth. Only so much data can fit through a connection at one time. Because bandwidth is limited, when we stream live video we must choose between high frame rate and high resolution. A higher frame rate is more useful for detecting events in progress. Click here to find out more.
Downloading the video file will always result in the highest available clarity.
Also note that live clarity may degrade if:
- You are viewing multiple cameras simultaneously. Try viewing one camera at a time instead.
- There is high network traffic or poor internet connection, either at the camera site or on your network.
- Another user may be simultaneously viewing cameras.
Q. Video clips won't download.
A. This is typically a permissions issue with IE. See Section 3: Run as Administrator for instructions.
1. Logging In
- Open Internet Explorer (no other browsers will work at this time, unfortunately) Note: Microsoft Edge is not the same as Internet Explorer and will NOT work! Double check that you are using Internet Explorer.
- Type in the NVR's address to the URL bar. This will be provided by the care team.
- At the bottom of the page, a prompt will request permission to run an extension. Click “allow.”
- Log in with the username and password that were provided to you by our care team.
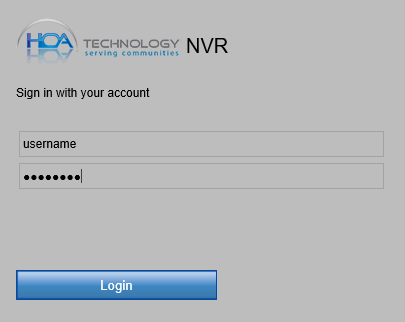
- Upon log in, you may be prompted by the browser to install plug-ins. If so, follow the instructions on screen and allow it to install the plug-ins necessary to view your cameras.
2. View your Cameras
- Upon logging in, you won't immediately see any cameras; you have to click a button to view the cameras you need. Click either the CAMERA icon at the left next to a camera name, or the Start All Live View icon at the bottom of the camera view screen.
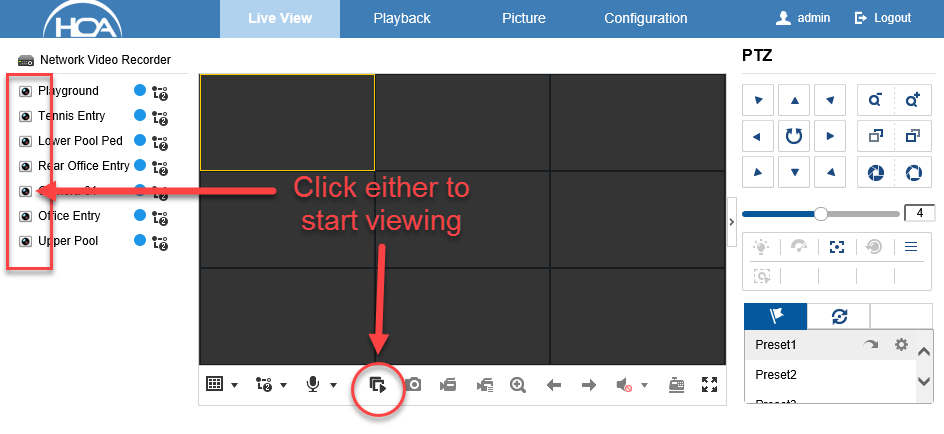
- To place a camera in a specific viewing area (the dark gray boxes), click on that viewing area. It will be outlined in yellow. Then in the camera list to the left, click the camera icon next to the camera name. This places the camera in that box.
- To view a camera full screen, double click on that view.
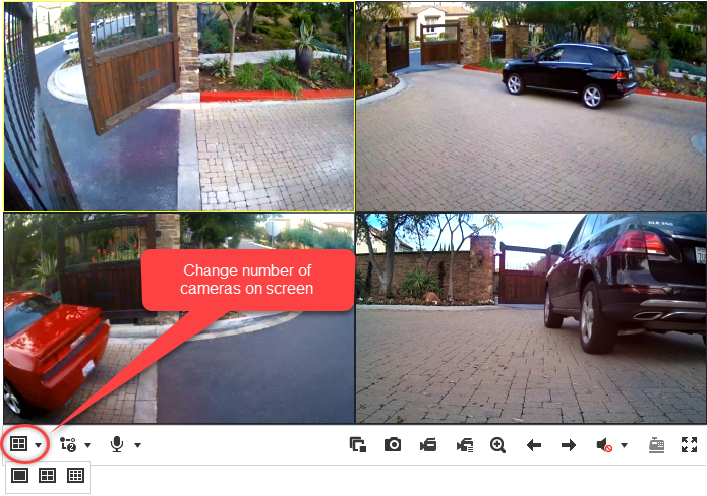
- To change how many cameras display on screen, click the icon indicated below.
Usage note: Streaming a camera takes up bandwidth. Only a certain amount of data can be sent or received per second. Viewing many cameras simultaneously will reduce the quality or refresh rate of all of the videos you are watching. As a result, viewing multiple cameras or viewing while another user is simultaneously accessing the NVR may result in jumping or stuttering video feeds. For best play quality, only watch one video at a time. Furthermore, for this reason, keep in mind videos streamed live are not necessarily in their maximum resolution. The full resolution can be obtained by downloading the video file; instructions for that will follow below.
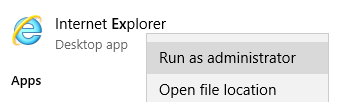
3. Run as Administrator
Before we can save any screen captures or video files, there is a small but critical step necessary to grant Internet Explorer the permission to save video footage to your disk.
Easy method: Right click on Internet Explorer in your start menu, and click on “Run as Administrator.” A popup will ask for permission; click Yes. Note that you will have to do this each time you open IE with the intention of downloading video from your NVR.
Backup method: This method is more permanent and you won't have to do it every time you need to download video. But it disables a browser security feature, so we only recommend doing this if you know what you're doing.
Click on the Settings icon at the top right hand corner of Internet Explorer, then scroll to Internet Options.
In the “Security” tab, uncheck “Enable Protected Mode” and then close and reopen Internet Explorer.
4. Saving Photos and Video from Live View
Sometimes all you need is the ability to quickly grab a picture or quick clip of something you are watching live.
From the Live View tab of the NVR, with any video clip selected, simply click on the camera icon at the bottom to save a screenshot instantly. Or click the Video “Start Recording” button to begin recording, then click it again to end the recording.
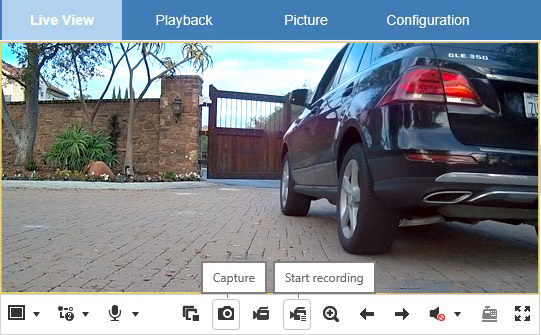
In either case, on the bottom right hand corner of your window, a popup will display with a link to the image or video file. Simply click on that link to view it in the Windows file explorer.
Troubleshooting: If the file fails to open, typically it is an Internet Explorer permissions issue. Revisit the previous section (Run as Administrator) and make sure IE is in Administrator mode.
5. Playback
Now the fun part. Under the Playback tab, select any camera for viewing. Then click the Play icon on the toolbar below the image.
You can select a certain day for viewing by clicking any day on the calendar to the right. Then click the Search button.
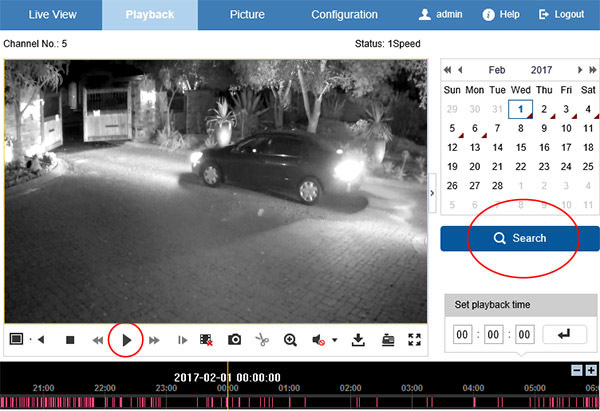
If footage exists on that particular day, there will be a small triangle beneath the date on the calendar. (Note that depending on video quality settings and hard drive space, older footage may be deleted after a certain period of time, usually 3+ weeks but it varies from location to location.)
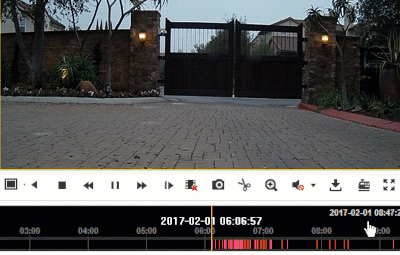
Below the play bar, you will see a black timeline with a yellow line in the middle. This yellow line is the playhead.
The white timestamp shows you exactly when the image at the playhead was captured.
Searching through your video is super easy. Just click and drag the black bar until you find what you are looking for.
Use the [-] [+] on the far right of the timeline to zoom in or out, granting yourself better control over the time range presented by the timeline.
Note: When in Playback mode, when you want to switch to a different camera, you must first press the Stop button below the video to end playback.
6. Download
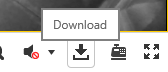
When you have found the footage you are looking for in Playback mode, click on the Download button on the bottom bar.
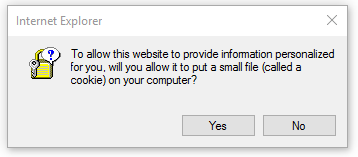
Click “Yes” to the popup that asks if it is okay to set cookies. I know what doctors say about cookies, but trust me when I say that these cookies are good for us.
The Download window will now open up to the camera you have selected, at whichever day you were viewing in Playback mode.
You can always change the camera, start time, and end time on the left bar.
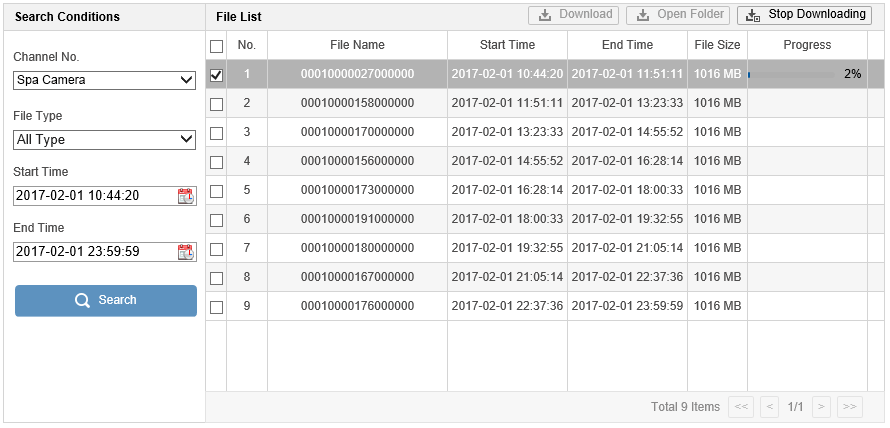
Check the box(es) corresponding to the video with the start and end times in the range you are looking for.
Above, I have selected a clip that will begin at 10:44 am and end at 11:51 am.
Once you have selected the clip(s) to download, click Download at the top and wait for the video to save to your computer.
Note: Depending on how your NVR saves footage, some of the clips may be quite large. If this is the case, send an email to HOA Technology and we have the ability to download and save small clips for you so that you do not need to download or process a large video file.
7. Additional Support
That's all for now! If you need assistance, we are happy to help! Call us, or send an e-mail to our customer care team at [email protected]